When we use motion detection via software, we have to take some precautions in relation to server processing and even identify areas of interest in the image for detection.
We must bear in mind that motion detection via software will always increase the processing of the image recording server. This happens because for each camera in which motion detection is activated, the server has to decode an entire chain of frames and from this chain only 2 frames are compared. An example of a CPU boost: decoding a whole chain of frames every second from a megapixel camera with H264 compression.
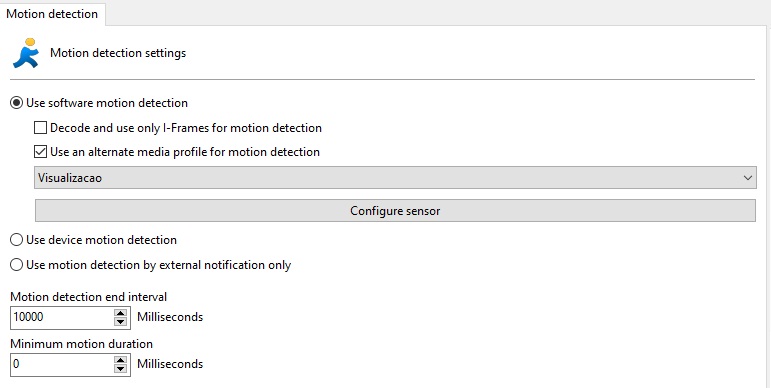
To reduce processing on the server, an option was developed that allows performing motion detection on a lower resolution media profile. In this way, images can be recorded in high resolution and motion detection in low resolution. The lower the resolution used for motion detection, the less processing used. It is recommended to get good detection at minimum CIF resolution. As for the frames per second, only 3 frames per second are recommended, because in a sequence of 30 frames only 2 frames would be analyzed.
To select a media profile for motion detection, select the option Use an alternative profile to detect motion and select the desired media profile as shown in the figure below.
To learn how to create media profiles see the chapter Media Profiles
Another option that helps to reduce CPU usage is the use of I-Frames only to detect movement. This option should offer a significant reduction in server CPU usage, however we recommend using a minimum of 1 I-Frame per second for the best motion detection performance. Just enable the option as in the image above (Decode and use only I-Frames for motion detection).
The Motion Sensor consists of a tool that allows the user to define areas of the image that will be sensitive or not sensitive to movement.
Setting the motion sensor is very important to save disk space used by the camera. If in the Camera tab you chose the motion detection recording method, it is recommended to adjust the sensor as needed.
By default, if the sensor is not configured, the entire image will be motion sensitive.
To access this feature, click the Configure Sensor button.
To configure the motion sensor, click on the Configure Sensor button.
When clicking this button, the motion sensor configuration window will be opened with a real camera image, as shown in the figure below:

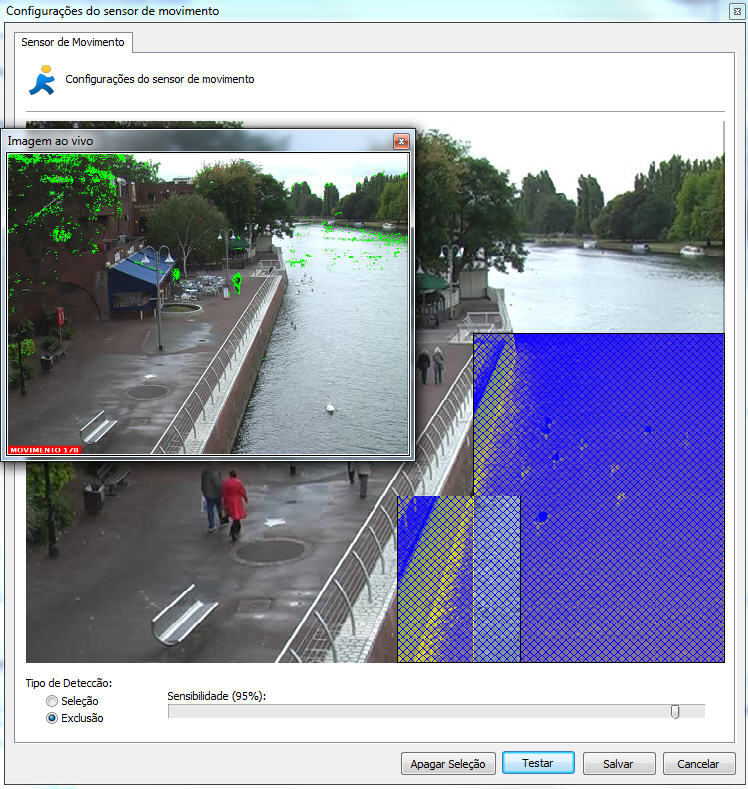
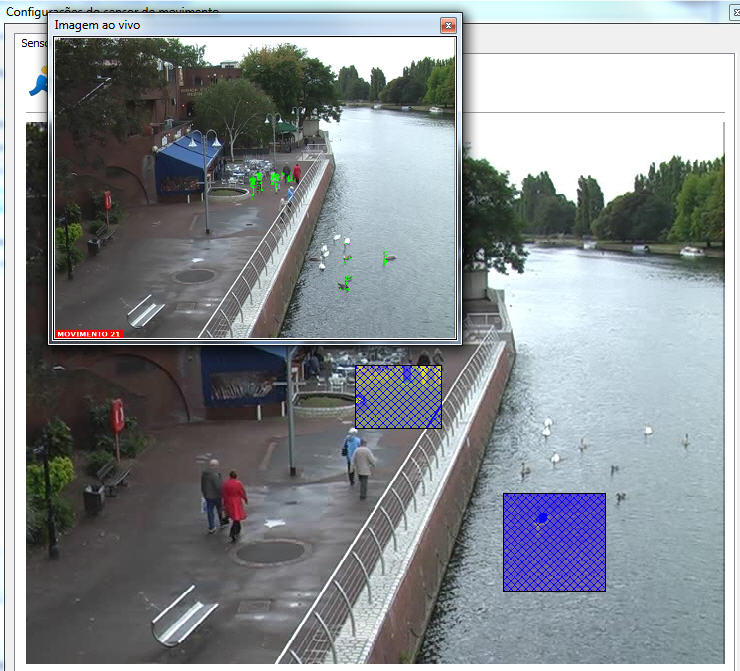
On this screen you can select areas that will be motion sensitive or areas that will not be motion sensitive.
To select areas that will be sensitive to motion, select the Selection detection type and click on the image, dragging the mouse, forming a selection square. To select areas that will not be sensitive to movement, select the Exclusion button, repeating the process.
To delete already configured areas, right-click the mouse and select the selection square to be deleted or click the Clear Selection button to delete all defined areas.
After selecting the desired areas, configure the motion sensitivity. By default the sensitivity is 80%, with this value it is already possible to detect any type of sudden movement in the image.
Once this is done, click on the Test button to view the operation of the selected motion detection.
For performance reasons, the server analyzes the camera images at two frames per second, that is, motion detection is not necessary in all frames, only one image is analyzed every 500ms. With this pattern any type of movement is detected.
The figure below demonstrates how the motion sensor works with selection of motion-sensitive areas:
The figure below demonstrates how the motion sensor works with selection of non-motion sensitive areas: