To add a server, click on the Add button, and to change a server, select the desired server from the list of servers and click on the Modify button or, if you prefer, double-click on the server. To remove a server, select the desired server and click Delete.
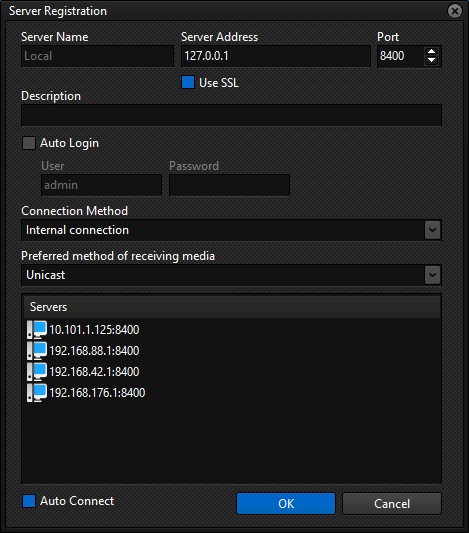
The image below illustrates the screen for inserting or modifying servers.

•Server name: Insert an identification name for the server. Once saved, this name cannot be changed, as it will be used to identify the server in the Surveillance Client.
•Server IP: Fill in this field with the server's IP address. A DNS address can also be used.
•Port: Enter the connection port to the server. The default port is 8600 for non-secure connections and 8400 for secure connections.
•Use SSL: Select this option to use a secure, encrypted connection to the server.
•Description: Enter a brief description for the server, used only to help the operator identify it in the system.
•Auto Login: This option enables the user and password fields to be filled in. By enabling this option, whenever the Surveillance Client is run or updated, it will authenticate to the server using the username and password provided. If this option is unchecked, the user must enter their username and password on the login screen that will appear when the client connects to the server.
•Connection Method: Select the type of connection to the server.
oInternal Connection: Select Internal Connection if the server is on your local network. With this option selected, the client will use the Private IP settings for direct access to the cameras (if configured).
oExternal Connection: Select External Connection if the server is connected via the internet. With this option selected, the client will use the Public IP settings for direct access to the cameras (if configured).
•Method of receiving media: Select the media transmission method from server to client:
oUnicast: Each object on the screen will open a new direct and independent connection with the system server. The video will be transferred through this connection.
oMulticast: If the server has multicast enabled, the Client can receive the video via multicast transmission, in order to save network resources, because if multiple clients are receiving a stream from the same camera, it will be sent only once on the network and shared with all the clients "connected" to this stream. Transmission via multicast will generally only work on local networks.
•Servers: Displays all servers found on the network. Select a record from the list and the Server IP and Port fields will automatically populate.
•Active: Select this option if you do not want the Surveillance Client to connect to this server. By unchecking this option, no object from this server will be available for viewing.
•Auto Connect: Causes the Surveillance Client to automatically connect to the server when started or refreshed.
|
|---|
If the user's password entered in the self-login fields is changed by the administrator in the Administration Client or changed by the user himself through the password change module, the values entered here must be updated. |
|
|---|
If the Server module is running on the same computer as the Surveillance Client, the Loopback IP identified by 127.0.0.1 can be used. |